All times are UTC


It is currently Sun Dec 01, 2024 6:54 am


Post new topic Reply to topic  [ 527 posts ]  Go to page Previous  1 ... 13, 14, 15, 16, 17, 18, 19 ... 27  Next
Author Message
 Post subject: Re: Gandlaf The Grey WIP - Bag End
PostPosted: Fri Jun 21, 2013 4:09 pm 
Elven Elder
Elven Elder
User avatar
Offline

Joined: Thu Aug 13, 2009 6:37 am
Posts: 3499
Location: Hull UK
Images: 14
I'm not 100% as yet, I've been concentrating on what you see.
I think it could be something like a black gloss sheet to create the reflection.
I've been on with Dagorlad about his Bag End and he used wire for some of the leaded lights and some etching sheets.
I have plenty on wire at different gauges so may try my own scratch built leaded lights.

_________________
Commission Service Available

mallysminiatures.blogspot.co.uk
Top
  Profile  
Reply with quote  
 Post subject: Re: Gandlaf The Grey WIP - Bag End
PostPosted: Mon Jun 24, 2013 2:32 pm 
Elven Elder
Elven Elder
User avatar
Offline

Joined: Thu Aug 13, 2009 6:37 am
Posts: 3499
Location: Hull UK
Images: 14
Image
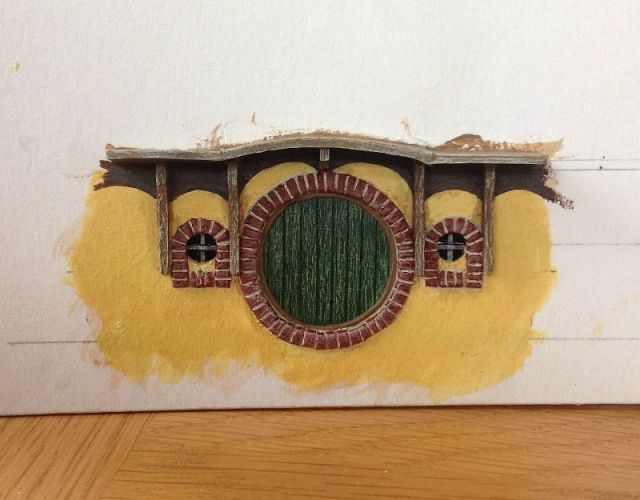
I tried various methods to cut up some thin wire to use as leaded lights, but I simply could not straighten out the bent wire.
I opted for some card used in a cross section.
I've applied some mortar to the brickwork but this section is about finished with just the handle and some rivets to sort.

_________________
Commission Service Available

mallysminiatures.blogspot.co.uk
Top
  Profile  
Reply with quote  
 Post subject: Re: Gandlaf The Grey WIP - Bag End
PostPosted: Mon Jun 24, 2013 2:45 pm 
Elven Elder
Elven Elder
User avatar
Offline

Joined: Thu Apr 01, 2010 11:33 pm
Posts: 3688
Location: Atlanta GA. U.S.A.
Images: 14
I tried drawing lines on clear plastic card. I did not like it. Some of the glass leading products work well in Doll house scales.
The card looks fine. Few people will know the difference.

Well done. 8)

Some friends took 400 photos of the Hobbit set while on vacation. I have not had time to Up load all of them from the Files. Some of them may be useful when you start on the ground work.

_________________
"the same as a duck you must be made of wood"
Top
  Profile  
Reply with quote  
 Post subject: Re: Gandlaf The Grey WIP - Bag End 24/06
PostPosted: Mon Jun 24, 2013 3:04 pm 
Elven Elder
Elven Elder
User avatar
Offline

Joined: Thu Aug 13, 2009 6:37 am
Posts: 3499
Location: Hull UK
Images: 14
I tried a few things to get an intricate look, including drawing lines on top of the black gloss window but it all looked rubbish.
The parlour window is coming up soon and that does need intricate work. I've searched relentlessly for some leaded light decal but found nothing.
The Bag End photos would be fantastic to see thanks, particularly the door and windows to the left side that you never see.
Thanks Charlie

_________________
Commission Service Available

mallysminiatures.blogspot.co.uk
Top
  Profile  
Reply with quote  
 Post subject: Re: Gandlaf The Grey WIP - Bag End 24/06
PostPosted: Mon Jun 24, 2013 3:59 pm 
Elven Elder
Elven Elder
User avatar
Offline

Joined: Thu Apr 01, 2010 11:33 pm
Posts: 3688
Location: Atlanta GA. U.S.A.
Images: 14
T
Quote:
he Bag End photos would be fantastic to see thanks, particularly the door and windows to the left side that you never see.


It does not look like they will let you walk up there.

Image

Image You should be able to veiw the abum on photo bucket by clicking on the thumbnail. If not I will check or change the settings . I have not been able to view all of the photos. Lynn took some and Jon took more. There are lots of detail photos of the mill and Green Dragon about 40 hobbit holes. It will take time to organize from snapshots.
I am putting the Bagend Photos in one file.

_________________
"the same as a duck you must be made of wood"
Top
  Profile  
Reply with quote  
 Post subject: Re: Gandlaf The Grey WIP - Bag End 24/06
PostPosted: Mon Jun 24, 2013 4:37 pm 
Elven Elder
Elven Elder
User avatar
Offline

Joined: Thu Aug 13, 2009 6:37 am
Posts: 3499
Location: Hull UK
Images: 14
Fantastic thanks Charlie. It seems there are very few photos if any of the back door. I have a John Howe sketch to work from though. As for the other windows I think the general style will be similar to the windows you can see, so one or two slight changes will fit the bill.
I have noted the film Bag End has an extra window to the right of the front door. Your picture shows this clearly. The plan I have for Bag End doesn't show this.
In a nutshell I think this gives me a degree of free license to interpret as I wish.

_________________
Commission Service Available

mallysminiatures.blogspot.co.uk
Top
  Profile  
Reply with quote  
 Post subject: Re: Gandlaf The Grey WIP - Bag End 24/06
PostPosted: Tue Jun 25, 2013 6:51 am 
Ringwraith
Ringwraith
User avatar
Offline

Joined: Tue Mar 02, 2004 11:59 am
Posts: 897
Location: Tampere, Finland
Images: 45
Here is a selection of LotR photos from my trip to NZ. At the end there are Hobbitton photos with some shots of Bag End. You may find some of the details from the other hobbit holes useful too.

I managed to sneak a bit to the left side (my left when looking at the front door) but not far and nowhere near the back door (I'm not even sure if it really exists on the site). Photos 240-242 are from that side. They really didn't let people roam around much. :-)

-- Pasi
Top
  Profile  
Reply with quote  
 Post subject: Re: Gandlaf The Grey WIP - Bag End 24/06
PostPosted: Tue Jun 25, 2013 7:24 am 
Elven Elder
Elven Elder
User avatar
Offline

Joined: Thu Aug 13, 2009 6:37 am
Posts: 3499
Location: Hull UK
Images: 14
Pasi
They are wonderful thank you and may I say your hat is very fetching...
Deep envy that I haven't been there, though I do hope to visit one day.

_________________
Commission Service Available

mallysminiatures.blogspot.co.uk


Last edited by Gandlaf the Grey on Tue Jun 25, 2013 8:11 am, edited 1 time in total.
Top
  Profile  
Reply with quote  
 Post subject: Re: Gandlaf The Grey WIP - Bag End 24/06
PostPosted: Tue Jun 25, 2013 8:02 am 
Kinsman
Kinsman
User avatar
Offline

Joined: Mon Oct 08, 2012 2:55 pm
Posts: 221
Looking great already mate. What are you going to use for the roof grass?

_________________
My Youtube Channel
Top
  Profile  
Reply with quote  
 Post subject: Re: Gandlaf The Grey WIP - Bag End 24/06
PostPosted: Tue Jun 25, 2013 8:10 am 
Elven Elder
Elven Elder
User avatar
Offline

Joined: Thu Aug 13, 2009 6:37 am
Posts: 3499
Location: Hull UK
Images: 14
Thanks Han. I'm looking toward a meadow look for the roof. So long grass with smattering s of colour to break up the green. The main thing will be the varying lengths of grass to create a realistic look.

_________________
Commission Service Available

mallysminiatures.blogspot.co.uk
Top
  Profile  
Reply with quote  
 Post subject: Re: Gandlaf The Grey WIP - Bag End 24/06
PostPosted: Tue Jun 25, 2013 11:54 am 
Elven Elder
Elven Elder
User avatar
Offline

Joined: Thu Apr 01, 2010 11:33 pm
Posts: 3688
Location: Atlanta GA. U.S.A.
Images: 14
valpas wrote:
Here is a selection of LotR photos from my trip to NZ. At the end there are Hobbitton photos with some shots of Bag End. You may find some of the details from the other hobbit holes useful too.

I managed to sneak a bit to the left side (my left when looking at the front door) but not far and nowhere near the back door (I'm not even sure if it really exists on the site). Photos 240-242 are from that side. They really didn't let people roam around much. :-)

-- Pasi


Great photos. The Mill wheel will be very useful I did not have a detail photo of that. 8)

_________________
"the same as a duck you must be made of wood"
Top
  Profile  
Reply with quote  
 Post subject: Re: Gandlaf The Grey WIP - Bag End 24/06
PostPosted: Tue Jun 25, 2013 12:34 pm 
Kinsman
Kinsman
User avatar
Offline

Joined: Wed Jan 23, 2013 5:07 am
Posts: 179
That hobbit hole is looking great!

_________________
check out and follow my Blog at http://madfroghobbit.blogspot.co.nz/
Top
  Profile  
Reply with quote  
 Post subject: Re: Gandlaf The Grey WIP - Bag End 24/06
PostPosted: Tue Jun 25, 2013 1:09 pm 
Elven Elder
Elven Elder
User avatar
Offline

Joined: Thu Aug 13, 2009 6:37 am
Posts: 3499
Location: Hull UK
Images: 14
Thanks Madfrog, I'm desperately trying to keep this is scale and I'm using Bilbos hand as a guide.
I want everything, size wise, to seem like a hobbit built it. It's not going to be totally possible but I will give it my best shot. This is part the reason I'm not totally happy with the cross sections in the windows. That may get looked at again as I go through this diorama as insure my skill and knowledge will improve with the more I do.

_________________
Commission Service Available

mallysminiatures.blogspot.co.uk
Top
  Profile  
Reply with quote  
 Post subject: Re: Gandlaf The Grey WIP - Bag End 24/06
PostPosted: Tue Jun 25, 2013 1:14 pm 
Kinsman
Kinsman
User avatar
Offline

Joined: Wed Jan 23, 2013 5:07 am
Posts: 179
You are very brave my friend to be taking on a task like that! haha but in the end it will all be worth it!

_________________
check out and follow my Blog at http://madfroghobbit.blogspot.co.nz/
Top
  Profile  
Reply with quote  
 Post subject: Re: Gandlaf The Grey WIP - Bag End 24/06
PostPosted: Wed Jun 26, 2013 4:28 pm 
Elven Elder
Elven Elder
User avatar
Offline

Joined: Thu Aug 13, 2009 6:37 am
Posts: 3499
Location: Hull UK
Images: 14
Image
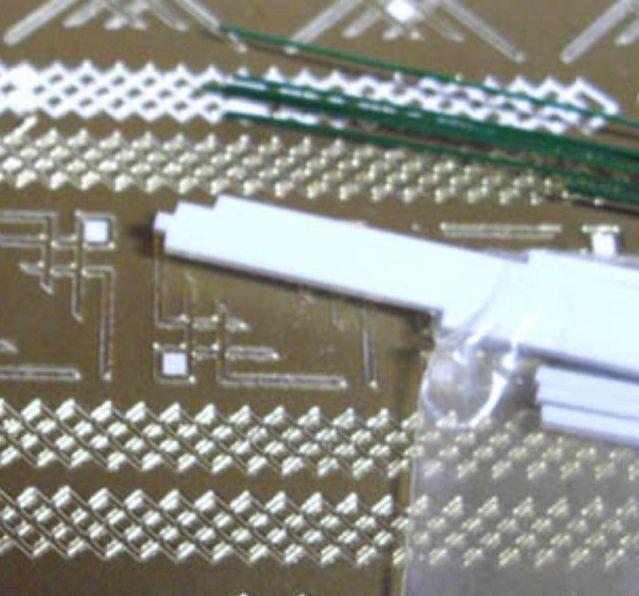
Does anyone know where I can get the cross section stickers you see above please ?
They are to be used for the leaded lights for the windows. I have been all over today and can't find anything remotely near.

_________________
Commission Service Available

mallysminiatures.blogspot.co.uk
Top
  Profile  
Reply with quote  
 Post subject: Re: Gandlaf The Grey WIP - Bag End Help 26/06
PostPosted: Fri Jun 28, 2013 12:40 pm 
Elven Elder
Elven Elder
User avatar
Offline

Joined: Thu Aug 13, 2009 6:37 am
Posts: 3499
Location: Hull UK
Images: 14
Image
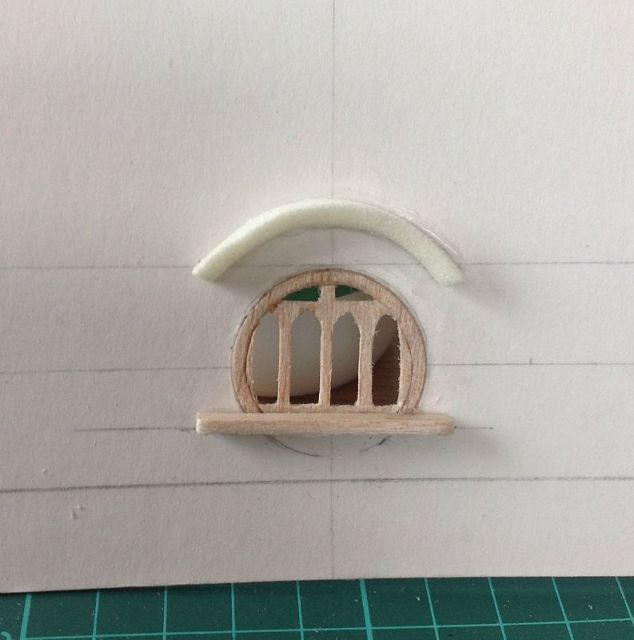
I've been working slowly on the parlour widow and above is the rough version. A big thanks to Durinsbane for his tips on cutting holes in balsa. It seemed to work very nicely.
It needs some cleaning up and there are supports to be added both under the arch and beneath the window sill.
I also plan to bend the card backwards to set the side windows in place. Some Milliput for brickwork and it will be painted up.
I'm still working on the leaded lights.

_________________
Commission Service Available

mallysminiatures.blogspot.co.uk
Top
  Profile  
Reply with quote  
 Post subject: Re: Gandlaf The Grey WIP - Bag End Help 26/06
PostPosted: Fri Jun 28, 2013 1:31 pm 
Ringwraith
Ringwraith
User avatar
Offline

Joined: Tue Jul 20, 2010 2:33 pm
Posts: 2145
Location: South West England, UK
Hi Mally, looking good, just wondering if you have tried Hoobycraft, they do a lot of dolls house products, maybe they will have something suitable.

i am passing near Axminster next week and there is a shop that specialize in model railway and scenery, i will call in to see if they have anything.

All the best

_________________
Harfoots-The first of the Hobbit people to cross over the Misty Mountains and enter Eriador.
Top
  Profile  
Reply with quote  
 Post subject: Re: Gandlaf The Grey WIP - Bag End Help 26/06
PostPosted: Fri Jun 28, 2013 2:01 pm 
Elven Elder
Elven Elder
User avatar
Offline

Joined: Thu Aug 13, 2009 6:37 am
Posts: 3499
Location: Hull UK
Images: 14
Paul your a star, thanks mate.
I've tried Hobbycraft and every other craft and toy shop I know. The only specialist model railway shop we had closed about 6 months ago and since then everything is becoming a bit generic and pricey.
I'm in Leeds in a few days so will have a scout around there. I've got hold of some styrene strips and some more wire that I intend to try out soon.
The advantage do the way I'm building this is I can leave the leaded lights for a good while yet and come back to them.
Thanks again and for reference, the small round windows next to the front door are 6mm.
The gaps in each window for the parlour are 4mm.

_________________
Commission Service Available

mallysminiatures.blogspot.co.uk
Top
  Profile  
Reply with quote  
 Post subject: Re: Gandlaf The Grey WIP - Bag End Help 26/06
PostPosted: Fri Jun 28, 2013 2:25 pm 
Elven Elder
Elven Elder
User avatar
Offline

Joined: Thu Apr 01, 2010 11:33 pm
Posts: 3688
Location: Atlanta GA. U.S.A.
Images: 14
I tried this several years ago. I was not trying to make a replica just experimenting trying to make fast Hobbit windows.

Image

The product is Plaid Gallery glass. It comes in clear and primary colors. The round window in the grass was made with unmodified leading strips and circles. I made the window inserts on the left by cutting PVC. The leading was cut from plastic canvas for needle work. The plastic leading comes in plain sheets you can cut with a razor. They also sell a simulated leading liquid. Fred used to use it for fine scale rivets.

_________________
"the same as a duck you must be made of wood"
Top
  Profile  
Reply with quote  
 Post subject: Re: Gandlaf The Grey WIP - Bag End Parlour 28/06
PostPosted: Fri Jun 28, 2013 2:39 pm 
Elven Elder
Elven Elder
User avatar
Offline

Joined: Thu Aug 13, 2009 6:37 am
Posts: 3499
Location: Hull UK
Images: 14
Interesting options thanks Charlie.

_________________
Commission Service Available

mallysminiatures.blogspot.co.uk
Top
  Profile  
Reply with quote  
Display posts from previous:  Sort by  
Post new topic Reply to topic  [ 527 posts ]  Go to page Previous  1 ... 13, 14, 15, 16, 17, 18, 19 ... 27  Next

All times are UTC


Who is online

Users browsing this forum: No registered users and 325 guests


You cannot post new topics in this forum
You cannot reply to topics in this forum
You cannot edit your posts in this forum
You cannot delete your posts in this forum
You cannot post attachments in this forum

Search for:
Jump to: