All times are UTC


It is currently Thu Dec 12, 2024 1:16 pm


Post new topic Reply to topic  [ 8 posts ] 
Author Message
 Post subject: Help with skin, finished product.
PostPosted: Thu Apr 22, 2010 6:29 pm 
Loremaster
Loremaster
User avatar
Offline

Joined: Fri Jan 18, 2008 5:03 pm
Posts: 1984
Location: Manitoba, Canada
Images: 1
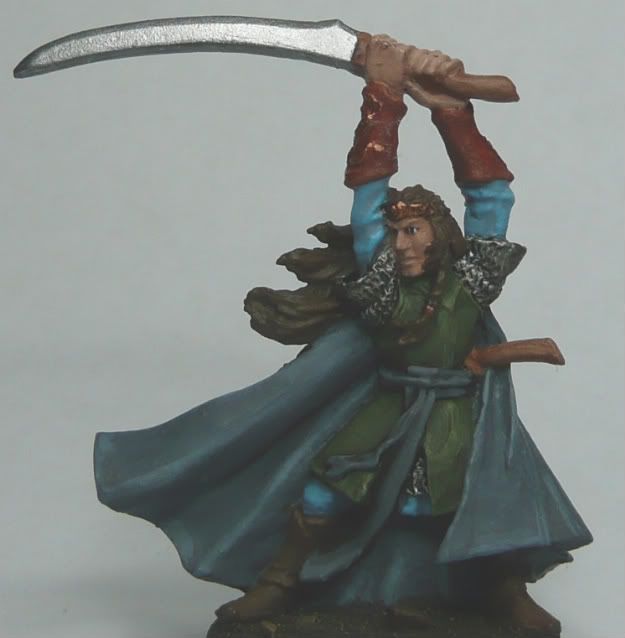
So, Anduril blade of kings had helped me know how to paint skin and I gave it a go, I really liked how it turned out. I have finally been able to borrow a camera and get a picture up of the finished product. I posted it here as I couldn't get the file small enough to go in my gallery and it's not a wip. Anyway, the picture. (It was a little dark to begin with so I had to use Gimp's lighten tool to make it brighter, it looks pretty much like it does in real life though. The first is lightened the second is not, I will try and get more pictures that are good sometime soon.)
Image
Image
Top
  Profile  
Reply with quote  
 Post subject:
PostPosted: Thu Apr 22, 2010 6:37 pm 
Elven Warrior
Elven Warrior
User avatar
Offline

Joined: Fri Aug 28, 2009 3:46 pm
Posts: 897
Location: Hear the sinister whisper of steel on leather? The quiet footsteps? You've found me.
That's some very nice work! Glad my advice was of some help :oops:

Very smooth blending, no chalky areas, good coverage....it's difficult to find something to criticize. If I had to though, I'd say the skin and hair could use another significantly lighter highlight, though that's just my personal opinion :)

_________________
Flying is the practice of trying to crash into the ground and missing.
Top
  Profile  
Reply with quote  
 Post subject:
PostPosted: Thu Apr 22, 2010 6:42 pm 
Loremaster
Loremaster
User avatar
Offline

Joined: Fri Jan 18, 2008 5:03 pm
Posts: 1984
Location: Manitoba, Canada
Images: 1
:D Criticism! :D :lol: I agree that the hair could do with another highlight. I am not so sure about the skin though, I could see that it could use one, but I don't want to wreck it. :P I also noticed that there is some dust on the left bracer and the left knuckles are also messed up a bit.
Thanks for the comment. :)
Top
  Profile  
Reply with quote  
 Post subject:
PostPosted: Thu Apr 22, 2010 7:07 pm 
Kinsman
Kinsman
User avatar
Offline

Joined: Tue Mar 02, 2010 10:51 pm
Posts: 150
Location: Pasadena, CA USA
Very nicely done. Everything looks very smoothly blended. 8) I do agree though that a final highlight to the highest areas of the face and hands would make it just that much better. From what I can see, you've got the skill to do that without worrying about messing up what you've already done.

_________________
My WIP Thread: http://www.one-ring.co.uk/phpBB2/viewtopic.php?t=17771
Top
  Profile  
Reply with quote  
 Post subject:
PostPosted: Thu Apr 22, 2010 7:28 pm 
Administrator
Administrator
User avatar
Offline

Joined: Tue May 17, 2005 7:51 pm
Posts: 1130
Location: Porto - Portugal
Images: 27
The eyes came out really well!
Overall, maybe some more contrast could spice it a bit but, nice work mate.

I edited the pictures to make them suitable to be uploaded to the gallery. When you save them as JPEG you can change the quality a bit. You can save them to your hard drive and then upload to your gallery.

The trick is to get as much quality you can but still just under 128k.

Here you go:
Image Image

_________________
Tell me... Do you bleed?
You will!
Chewy, we're home!
Top
  Profile  
Reply with quote  
 Post subject:
PostPosted: Thu Apr 22, 2010 7:44 pm 
Loremaster
Loremaster
User avatar
Offline

Joined: Fri Jan 18, 2008 5:03 pm
Posts: 1984
Location: Manitoba, Canada
Images: 1
Thanks for the comment, I agree I got the eye's very nice, probably my best yet. :)
One question though,
1. how do I reduce the quality of the photo's so they're small enough to put in my gallery? (I don't want you to have to do them all for me!) :P I have gimp and also a photobucket account. (I have figured out how to crop, re-size, and lighten the pics but not how to reduce the quality, any help would be appreciated. :)
Thanks
Top
  Profile  
Reply with quote  
 Post subject:
PostPosted: Thu Apr 22, 2010 8:07 pm 
Administrator
Administrator
User avatar
Offline

Joined: Tue May 17, 2005 7:51 pm
Posts: 1130
Location: Porto - Portugal
Images: 27
Gimp will do.

Use the 'Save as' command on the 'File' menu, then choose JPG or JPEG as file extension.
When you hit Save a new panel will open with a quality thingy that you can set. Less quality means less space.

Here's a screenshot. My version has a mix of english and portuguese commands that I find hillarious. :lol:

Image

The trick, like I said, is to reduce just the enough to be under 128k.[/list]


Also, dont use the brightness option to 'lighten' the picture. Go to menu 'Colors', choose 'Levels' and then click 'automatic'. The pictures will be much more clear... that is not always a good thing though ehe.

Hope this helps. :oops:

_________________
Tell me... Do you bleed?
You will!
Chewy, we're home!
Top
  Profile  
Reply with quote  
 Post subject:
PostPosted: Fri Apr 23, 2010 7:28 pm 
Loremaster
Loremaster
User avatar
Offline

Joined: Fri Jan 18, 2008 5:03 pm
Posts: 1984
Location: Manitoba, Canada
Images: 1
Definitely helped, thanks a lot! :-D

Now I have to try and get a good lighting set up for taking good pictures that don't have to be fiddled with. :x
Top
  Profile  
Reply with quote  
Display posts from previous:  Sort by  
Post new topic Reply to topic  [ 8 posts ] 

All times are UTC


Who is online

Users browsing this forum: No registered users and 37 guests


You cannot post new topics in this forum
You cannot reply to topics in this forum
You cannot edit your posts in this forum
You cannot delete your posts in this forum
You cannot post attachments in this forum

Search for:
Jump to: