All times are UTC


It is currently Sat Nov 30, 2024 8:46 pm


Post new topic Reply to topic  [ 17 posts ] 
Author Message
 Post subject: Starting with Smaug, now with photos
PostPosted: Sat Dec 13, 2014 11:24 pm 
Wayfarer
Wayfarer
Offline

Joined: Thu Dec 27, 2012 2:04 pm
Posts: 11
Hello everyone,

Long time lurker amount these great pages but yet to make any real imput.

So that's about to change and hopefully for the better.

I have received and started work on the amazing smaug model, seriously I recommend this for any one who wants a hobby challenge. So this blog will follow progress on the old lizard to start with.

It will also follow my progress with other hobbit projects (notibly the 13 dwarfs and goblins to start) and hopefully I'll have time to paint some of the vast collecting of LotR models I have built up.

I post the first progress pictures of smaug tomorrow along with some shots of the dwarfs so far.

Chris


Last edited by ninjaboyun on Sun Dec 14, 2014 10:29 pm, edited 1 time in total.
Top
  Profile  
Reply with quote  
 Post subject: Re: Starting with Smaug
PostPosted: Sun Dec 14, 2014 4:59 am 
Loremaster
Loremaster
Offline

Joined: Wed May 21, 2014 1:55 am
Posts: 1478
Location: Seattle,Washington USA
Will be watching this!

_________________
"Even darkness must pass. A new day will come. And when the sun shines it will shine out the clearer."
Top
  Profile  
Reply with quote  
 Post subject: Re: Starting with Smaug
PostPosted: Sun Dec 14, 2014 5:58 am 
Craftsman
Craftsman
User avatar
Offline

Joined: Fri Oct 02, 2009 9:24 pm
Posts: 290
Location: Wanaka, Central Otago, New Zealand
Though I'm busy quietly hating everyone who managed to get a Smaug, my curiosity will of course allow me to view and compliment the work of those same people :-D
I look forward to seeing your progress!

_________________
http://bdhobbymadness.blogspot.co.nz/

May the wind under your wings bear you to where the sun sails and the moon walks!
Top
  Profile  
Reply with quote  
 Post subject: Re: Starting with Smaug
PostPosted: Sun Dec 14, 2014 10:02 am 
Elven Elder
Elven Elder
User avatar
Offline

Joined: Thu Aug 13, 2009 6:37 am
Posts: 3499
Location: Hull UK
Images: 14
Welcome and nothing like starting from the top, watching with interest.

_________________
Commission Service Available

mallysminiatures.blogspot.co.uk
Top
  Profile  
Reply with quote  
 Post subject: Re: Starting with Smaug
PostPosted: Sun Dec 14, 2014 8:51 pm 
Wayfarer
Wayfarer
Offline

Joined: Thu Dec 27, 2012 2:04 pm
Posts: 11
Really struggling to embed images in to my post, I have attach a screen shot of the error I am receiving in the editor. (Not attached as the file is to big)

It say

"You cannot use certain BB codes [url]"

I'm trying to upload the images from photo bucket and have copied the img link and pasted it into the body.

Any ideas?
Top
  Profile  
Reply with quote  
 Post subject: Re: Starting with Smaug
PostPosted: Sun Dec 14, 2014 9:17 pm 
Wayfarer
Wayfarer
Offline

Joined: Thu Dec 27, 2012 2:04 pm
Posts: 11
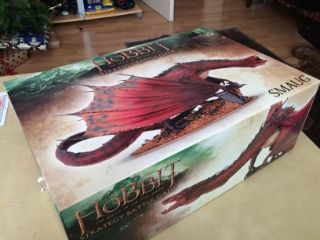
And so it begins....
Image

First up the box is fantastic, heaven duty cardboard covered in photos. The instructions are printed on the inside sleeve.

Image

The inner sleeve appeals very much to my geeky side.

Image

Everything is nicely packed.

Image

All the bits laid out following cleaning, the casts are pretty good with a couple of 1-2 mm mold-slip lines which will come out with a little work.

Image


He's a big old beastie.

Image

Image

Image

First thing to know about this kit is the detail, his skin looks real and each of the horns are beautiful crisp and sharp.

I started on the head the neck pictured above is 5 parts which all fit well together, of course with this size of kit there is a lot of filling to do. Now I'm not fantastic with green stuff but anyone looking for advice, I do have a little.

1) use proper tools, I use GW's new set and they are fantastic
2) make sure you green stuff is well mixed
3) keep your tools wet, regularly dipping in clean water or the putty will stick to them
4) let the lines of the model guide you when shaping the green stuff once you have filled a gap to continue any detail that should be there
5) let it cure for 30-60 mins before trying to add detail (I fill with it straight away as it's more workable)
6) be careful not to touch it whilst filling other gaps (everyone has done it)

I'm going to crack on, I'm posting this knowing the photos aren't working but with the hope of getting some advise as URL links are not working for me

Chris


Last edited by ninjaboyun on Sun Dec 14, 2014 9:59 pm, edited 1 time in total.
Top
  Profile  
Reply with quote  
 Post subject: Re: Starting with Smaug
PostPosted: Sun Dec 14, 2014 9:18 pm 
Elven Elder
Elven Elder
User avatar
Offline

Joined: Thu Aug 13, 2009 6:37 am
Posts: 3499
Location: Hull UK
Images: 14
You need a photo bucket account. Upload your photos into there and copy the image URL and paste that here.

_________________
Commission Service Available

mallysminiatures.blogspot.co.uk
Top
  Profile  
Reply with quote  
 Post subject: Re: Starting with Smaug
PostPosted: Sun Dec 14, 2014 9:40 pm 
Wayfarer
Wayfarer
Offline

Joined: Thu Dec 27, 2012 2:04 pm
Posts: 11
That is what I have tried to do but got the error in the post above
Top
  Profile  
Reply with quote  
 Post subject: Re: Starting with Smaug
PostPosted: Sun Dec 14, 2014 9:42 pm 
Elven Warrior
Elven Warrior
User avatar
Offline

Joined: Fri Jun 25, 2010 11:38 am
Posts: 555
Location: Hull, UK
Not the a href tag, the only ne with the img in square brackets :)

_________________
++ THE VANUS TEMPLE ++
Contact for commissions!
Top
  Profile  
Reply with quote  
 Post subject: Re: Starting with Smaug now with real photos
PostPosted: Sun Dec 14, 2014 10:00 pm 
Wayfarer
Wayfarer
Offline

Joined: Thu Dec 27, 2012 2:04 pm
Posts: 11
Thanks for the assistants.

I'll work on the image sizes for next time
Top
  Profile  
Reply with quote  
 Post subject: Re: Starting with Smaug, now with photos
PostPosted: Mon Dec 15, 2014 6:16 am 
Elven Elder
Elven Elder
User avatar
Offline

Joined: Thu Aug 13, 2009 6:37 am
Posts: 3499
Location: Hull UK
Images: 14
Wow, immense model, would love to get my hands on it.

_________________
Commission Service Available

mallysminiatures.blogspot.co.uk
Top
  Profile  
Reply with quote  
 Post subject: Re: Starting with Smaug, now with photos
PostPosted: Mon Dec 15, 2014 12:35 pm 
Loremaster
Loremaster
Offline

Joined: Thu Feb 09, 2012 11:01 am
Posts: 1829
Location: Lancashire
Here sure is a big fella

_________________
My Miniatures Blog (covering LOTR/Terminator/Doctor Who/Warpath and more!):
http://cruciumgiger.blogspot.co.uk/
Top
  Profile  
Reply with quote  
 Post subject: Re: Starting with Smaug, now with photos
PostPosted: Mon Dec 15, 2014 7:32 pm 
Ringwraith
Ringwraith
User avatar
Offline

Joined: Tue Jul 20, 2010 2:33 pm
Posts: 2145
Location: South West England, UK
Following with great interest, the head looks amazing!!!!

How are the gaps? much filling???

_________________
Harfoots-The first of the Hobbit people to cross over the Misty Mountains and enter Eriador.
Top
  Profile  
Reply with quote  
 Post subject: Re: Starting with Smaug, now with photos
PostPosted: Mon Dec 15, 2014 9:54 pm 
Elven Warrior
Elven Warrior
User avatar
Offline

Joined: Fri Jun 25, 2010 11:38 am
Posts: 555
Location: Hull, UK
Harfoot wrote:
Following with great interest, the head looks amazing!!!!

How are the gaps? much filling???


Fair few gaps on mine.. I found it best to heat the parts and try and fit them together before gluing, as some large parts like the wings are a little warped. Still loads of gap filling to do though on the larger pieces! :(

_________________
++ THE VANUS TEMPLE ++
Contact for commissions!
Top
  Profile  
Reply with quote  
 Post subject: Re: Starting with Smaug, now with photos
PostPosted: Mon Dec 15, 2014 10:52 pm 
Wayfarer
Wayfarer
Offline

Joined: Thu Dec 27, 2012 2:04 pm
Posts: 11
So the main construction is about done minus the spikes, so far about 3-4 hours in. Just the spikes to go.

Image

Image

As you can see he is a big old fella.

Image

The gaps are what I would expect from a forge world model of this scale. The worst areas are the neck to the body and the wings along the body. The wings I'll heat and fit ant the filling will be easy as it's along armoured plates.

The neck is a little more difficult due to the amazing scale details, it's not a big gap maybe 2mm.

Image

My plan is to shallow fill it then to put a layer of warm green stuff on it then make a mold from a different part of the skin an stamp the detail in and do a final fix. Let's see how it goes....

Image

Finally the base which is fantastic, the detail is amazing.

The next session will have to wait till the weekend however as I'm away with work tomorrow.

Thanks for the interest so far!

Chris
Top
  Profile  
Reply with quote  
 Post subject: Re: Starting with Smaug, now with photos
PostPosted: Mon Dec 15, 2014 11:05 pm 
Loremaster
Loremaster
User avatar
Offline

Joined: Wed Jul 08, 2009 1:13 pm
Posts: 1465
Location: Montreal, Qc, Canada
Images: 30
Amazing, keep up the good work!

_________________
My Lotr backlog: 305/952[][][][][][][][][][]32% completed
Painting Lineup: Mumakil x2, Rohan Heroes x8, Haradrim, SKoDA
Top
  Profile  
Reply with quote  
 Post subject: Re: Starting with Smaug, now with photos
PostPosted: Tue Dec 16, 2014 10:13 am 
Loremaster
Loremaster
Offline

Joined: Thu Feb 09, 2012 11:01 am
Posts: 1829
Location: Lancashire
It's great seeing him come together, he's quite the "miniature".

_________________
My Miniatures Blog (covering LOTR/Terminator/Doctor Who/Warpath and more!):
http://cruciumgiger.blogspot.co.uk/
Top
  Profile  
Reply with quote  
Display posts from previous:  Sort by  
Post new topic Reply to topic  [ 17 posts ] 

All times are UTC


Who is online

Users browsing this forum: No registered users and 163 guests


You cannot post new topics in this forum
You cannot reply to topics in this forum
You cannot edit your posts in this forum
You cannot delete your posts in this forum
You cannot post attachments in this forum

Search for:
Jump to: